【教程】用金属网制作的眼睛(所有网状材料适用)
共1页

捣鼓教程之前,我先谈谈我的看法。金属网本身具有一定的优越性,比如更牢固、更精确、不易搞砸等等,但金属网也有很多缺点,比如不安全、不易加工。冲孔板也是一样。塑料材质的网有一些比较软,这些可能加工起来方便一点,但不容易成型,或者形状不稳定;而硬一点的塑料板可能比较脆,不牢固,因此极端情况下也有产生隐患的可能。至于十字绣的底网,这种材料最大的缺点就是视线不好,因为孔比较稀疏,除此之外倒是没啥缺点。
原教程只有三张图,直接从这些图得出的经验约等于0,但其中包含的更多深层次的东西我要往深里挖掘。为什么找不到理想的材料呢?这三张图会告诉你答案的。此外,本教程也不是最完美的制作方法,本身可能也存在着一些问题,因此请不要将该教程看得多么权威。但这个教程也有很多值得学习的地方,可以这么说,有了这个教程,网状材料制作的眼睛基本没啥问题了,最终效果不亚于DHC、FS6这些。至于3D眼与否,这与头部的框架有关,本教程暂时不会涉及。以下为教程正文。注:我不会完全照搬原文,我会根据我的理解和认识进行一些适当的补充。
1楼 2013-01-20 16:27:37
play月光如水k [破坏者] 于2018-07-29 04:46删除了这个帖子。
飛翔之龍 [破坏者] 于2018-06-11 23:04将这个帖子取消加精。
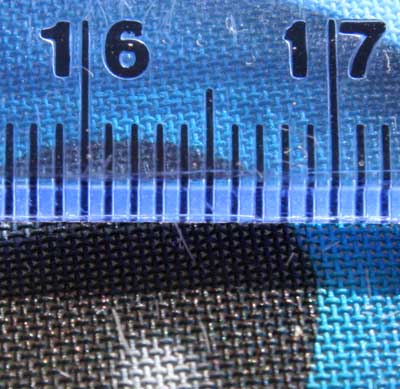 Metal Mesh Eyes
This tutorial covers the construction of the metal mesh eyes as used in my
husky fursuit Kibble. The picture (right) shows the fine mesh used (the ruler
marked in millimeters; one millimeter is very roughly
1/32nd of an inch), that allows good vision while
obscuring the wearer's eyes. The white bristles are actually fine faux-fur
fibres.
As described the technique involves some careful soldering, and some skill is
required. It shouldn't be your first soldering project! An alternative approach
may be to use a strong epoxy resin glue (such as Areldite) to fix the mesh to
the wire rim - this still needs to be tested.
Metal Mesh Eyes
This tutorial covers the construction of the metal mesh eyes as used in my
husky fursuit Kibble. The picture (right) shows the fine mesh used (the ruler
marked in millimeters; one millimeter is very roughly
1/32nd of an inch), that allows good vision while
obscuring the wearer's eyes. The white bristles are actually fine faux-fur
fibres.
As described the technique involves some careful soldering, and some skill is
required. It shouldn't be your first soldering project! An alternative approach
may be to use a strong epoxy resin glue (such as Areldite) to fix the mesh to
the wire rim - this still needs to be tested.3楼 2013-01-20 16:30:24
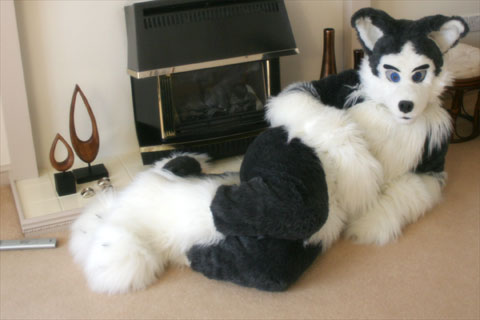
这篇教程主要讲了原作者的哈士奇装Kibble的眼睛的构成。楼上的图中可以看到其所用的金属网材料(图中标尺为厘米尺,一小格是一毫米),这种材料具有良好的视野。白色的虚毛也用了比较高档的长毛绒布料。为了更直观地表现出最终效果,贴两个Kibble的图:

 我们再来回到楼上那张图,我就不重发了,有需要回顾的就自己往上翻吧。为什么这种材料比较好呢?我在淘宝上搜了很长时间,金属网存在的主要问题就是金属丝太细,这样的话虽然视野比较好,但网孔比较稀疏容易曝光。那么,如何才能找到称心如意的金属网呢?其实远在天边,近在眼前。提前看一下第三张图:
 如何?虽然图拍得不是很清楚,但也已经可以看出其实原作者用的这种金属网也不是很密实,再看看第一张图,总体来讲淘宝上我搜到的那种(请搜“金属补品 金属网”)材料基本上可以满足要求,无非就是多刷几层丙烯颜料而已。
回到正文。本教程或许需要一定的敢接技术,我在翻译本文时会尽量想出一些避免焊接的方法。其实焊接只是用简单的电烙铁焊接,只要不是你第一次用电烙铁,也可以试试原文中的那些焊接方法。此外,也有可能用到环氧AB树脂,虽然这东西淘宝很多也很便宜,但毕竟多样东西多样麻烦。从本教程的三张图中(其实是四张),其实我并没有看到哪里必须用到这东西。原文中说环氧AB树脂是用来使金属网和外环更好的贴合,不过我觉得这里用热熔胶也可以吧。
如何?虽然图拍得不是很清楚,但也已经可以看出其实原作者用的这种金属网也不是很密实,再看看第一张图,总体来讲淘宝上我搜到的那种(请搜“金属补品 金属网”)材料基本上可以满足要求,无非就是多刷几层丙烯颜料而已。
回到正文。本教程或许需要一定的敢接技术,我在翻译本文时会尽量想出一些避免焊接的方法。其实焊接只是用简单的电烙铁焊接,只要不是你第一次用电烙铁,也可以试试原文中的那些焊接方法。此外,也有可能用到环氧AB树脂,虽然这东西淘宝很多也很便宜,但毕竟多样东西多样麻烦。从本教程的三张图中(其实是四张),其实我并没有看到哪里必须用到这东西。原文中说环氧AB树脂是用来使金属网和外环更好的贴合,不过我觉得这里用热熔胶也可以吧。
我们再来回到楼上那张图,我就不重发了,有需要回顾的就自己往上翻吧。为什么这种材料比较好呢?我在淘宝上搜了很长时间,金属网存在的主要问题就是金属丝太细,这样的话虽然视野比较好,但网孔比较稀疏容易曝光。那么,如何才能找到称心如意的金属网呢?其实远在天边,近在眼前。提前看一下第三张图:
如何?虽然图拍得不是很清楚,但也已经可以看出其实原作者用的这种金属网也不是很密实,再看看第一张图,总体来讲淘宝上我搜到的那种(请搜“金属补品 金属网”)材料基本上可以满足要求,无非就是多刷几层丙烯颜料而已。
回到正文。本教程或许需要一定的敢接技术,我在翻译本文时会尽量想出一些避免焊接的方法。其实焊接只是用简单的电烙铁焊接,只要不是你第一次用电烙铁,也可以试试原文中的那些焊接方法。此外,也有可能用到环氧AB树脂,虽然这东西淘宝很多也很便宜,但毕竟多样东西多样麻烦。从本教程的三张图中(其实是四张),其实我并没有看到哪里必须用到这东西。原文中说环氧AB树脂是用来使金属网和外环更好的贴合,不过我觉得这里用热熔胶也可以吧。4楼 2013-01-20 17:17:30
Step 1: Form the eye shape  The outer rim of the eye is made from solid copper wire with a
cross-sectional area of 2.5mm2. This is commonly used in wiring to
electrical sockets in Europe, and can be stripped out of Twin-And-Earth cables
from a DIY store. This is roughly equivalent to 13 AWG, but it is not a critical
dimension, the wire needs to be stiff but malleable. Strip off all the
insulation. The surface of the copper should be bright and shiny, if it is not
you may have trouble soldering it later.
Form the wire into the eye hole as needed, use the pliers or fingers to bend
it as needed. The form need not be two dimensional. Most eyes will be curved.
Spend some time getting this step right, and making sure the eyes match each
other. Finally adjust the size and cut the wire to length at an angle.
Solder the ends of the wire together. It helps to rest it on a heat proof
surface, or hold it in a clamp. The copper wire conducts heat readily from the
soldering iron to your fingers!
The outer rim of the eye is made from solid copper wire with a
cross-sectional area of 2.5mm2. This is commonly used in wiring to
electrical sockets in Europe, and can be stripped out of Twin-And-Earth cables
from a DIY store. This is roughly equivalent to 13 AWG, but it is not a critical
dimension, the wire needs to be stiff but malleable. Strip off all the
insulation. The surface of the copper should be bright and shiny, if it is not
you may have trouble soldering it later.
Form the wire into the eye hole as needed, use the pliers or fingers to bend
it as needed. The form need not be two dimensional. Most eyes will be curved.
Spend some time getting this step right, and making sure the eyes match each
other. Finally adjust the size and cut the wire to length at an angle.
Solder the ends of the wire together. It helps to rest it on a heat proof
surface, or hold it in a clamp. The copper wire conducts heat readily from the
soldering iron to your fingers!5楼 2013-01-20 17:18:43
第一步: 眼睛的大致轮廓
眼睛轮廓是用2.5平方毫米的铜线弯出来的,这种铜线应该在电缆里边用的比较多,应该也不是很难买,如果买不到的话用差不多粗的铁丝也可以。如果你有能力用电烙铁把接头给焊上,你应该知道铜丝应该选用柔韧性适中、表面光洁的,否则焊接时很麻烦。
眼睛轮廓的形状不是一定的,需要什么形状就弯成什么形状。原文中具体没说怎么弯,但我觉得不说也行,只要提醒一下,要灵活一点,别太呆板,眼睛轮廓的一般都是些弧形边。两个轮廓一定要对称相符(完全相同也行),没经验不要紧,多试试就好了。
焊的时候注意别烫伤,铜导热很强。最好是放到耐热材料上或者用钳子钳住。不过我觉得用热熔胶粘的强度也应该够了。
6楼 2013-01-20 17:35:58
Step 2: Cut out the copper mesh
The copper mesh used is 40 mesh which means there are 40 threads per inch in
each direction, and normally the gaps between threads are as wide as the wires
(so each wire is 1/80th of and inch wide). If you use a
finer mesh you may find that the holes clog up to easily when painting (by the
time you get to 200 or 400 mesh you begin to see interesting diffraction effects
too). Copper is used because it's easy to solder. Other metals can be used if
you are familiar with soldering them.
Lay the eye form on the mesh and draw around it with the permanent marker.
You need to allow a few millimeters around the outside of the eye shape to fold
the mesh around the wire. Cut the shape out with scissors (not your best fabric
or kitchen scissors). Take care not to get any of the fine copper trimmings
where they might be painful later.
7楼 2013-01-20 17:40:53
第二步:切割铜网
这里用的是40目铜网,这个其实淘宝上也有,但不知道能不能零卖(而且只买一点点……)。如果能买来当然更好,如果不好买,还是搜一下“金属补品 金属网”比较方便,毕竟这种网子就是用来做模型的。当然,更密的铜网可能用喷笔上色的时候更好上,但如果太高比如高达200~400目的话,估计就会产生衍射作用了。衍射是啥,这个高中物理里边应该学过吧。
把上一步里的框框放到网子上,用记号笔描一遍。要描得比框框大一圈,大概多出个几毫米。用剪刀按这个形状剪下来(别用你太好的剪刀,当然如果有专用工具更好),尽量不要剪出很多碎铜屑,否则以后不好打扫。
8楼 2013-01-20 17:50:34
Step 3: Solder the mesh to the form 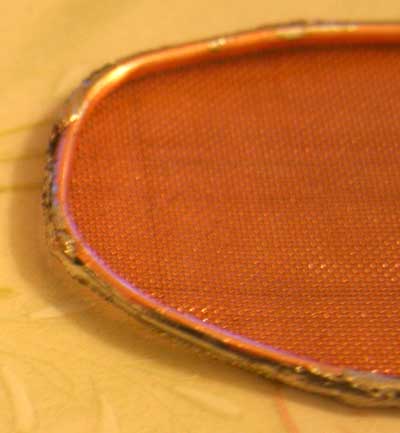 This is probably one of the trickiest steps, and I wouldn't recommend it if
you are not comfortable with soldering.
Begin by folding one end of the mesh over the wire rim and tacking it onto
the outside edge. Repeat the process at the opposite end of the eye, ensuring
the mesh is taught. Repeat the process at several other points around the edge.
Avoid getting solder (or flux) on the front or back of the eye. Also avoid
soldering near the join in the wire rim - it will spring open.
Once the mesh is tacked in place, curve the edges of the mesh around the wire
rim (use the handle of the teaspoon), trim to length, and solder down. Finally
work on the part near the join in the rim. With the mesh holding the rim in
place it should not spring apart as this joint is re-heated.
This is probably one of the trickiest steps, and I wouldn't recommend it if
you are not comfortable with soldering.
Begin by folding one end of the mesh over the wire rim and tacking it onto
the outside edge. Repeat the process at the opposite end of the eye, ensuring
the mesh is taught. Repeat the process at several other points around the edge.
Avoid getting solder (or flux) on the front or back of the eye. Also avoid
soldering near the join in the wire rim - it will spring open.
Once the mesh is tacked in place, curve the edges of the mesh around the wire
rim (use the handle of the teaspoon), trim to length, and solder down. Finally
work on the part near the join in the rim. With the mesh holding the rim in
place it should not spring apart as this joint is re-heated.13楼 2013-01-21 13:17:59
第三步:把网和框焊接到一块儿
这或许是最纠结的一步,如对焊接过程有任何不适,原作者不推荐进行这一步。我觉得用热熔胶就可以了,没必要焊得那么结实。
首先要通过针线固定等方法从一端把网子固定在框框的外侧,然后再固定另一端,然后再多固定几个点。如果是焊接的,要避免焊锡滴在“眼睛”的正面或背面,并且要避开框框的那个焊接点,否则一受热容易断开。
网在外框上固定得比较平整以后,用勺柄等坚硬物把网子多出来的边弯下去包住外框,修剪平整,然后开始焊接。最后焊接外框焊接点附近,毕竟网和框焊接好了以后外框的焊接点再怎么整也不会断开了。
14楼 2013-01-21 13:33:12
Step 4: Add the curvature of the eye
The copper mesh is still malleable and can be formed into a curved surface by
working it with a suitable tool. I've done this by holding the eye in my cupped
palm and rubbing it with the bowl of the teaspoon. It takes a little time, but
results in a better look and a stronger eye.
Step 5: Cleaning
It's critical that the surface of the eye is clean before you paint it. Right
now it will be covered in flux droplets and grease from handling.
I use Flash all-purpose household cleaner and an old (but clean) toothbrush
to scrub the flux residue off the mesh. You may want to experiment with other
cleaners available locally. Afterwards I rinse the mesh well with clean water,
and then clean with Methylated Spirits or Alcohol. Avoid drying the mesh with
anything that will shed fibres; these will cause blockages while painting.
15楼 2013-01-21 13:35:17
第四步: 让眼睛有一点弧度
此时铜网还有一定的延展性,原作者是把“眼睛”放在手里用勺子背压出来的弧度,这个过程有点费时间,但据说效果不错。
第五步:清洁
喷绘之前要保证表面光洁,现在上面应该有一些焊锡和手上的汗渍。原作者清洁汗渍用的是家用万能闪光清洁剂和一把旧牙刷,你也可以试试其他的清洁剂。然后,用清水冲洗网洞,再用究竟冲洗。干燥时不要用容易脱落纤维的东西擦拭,否则不好上色。
16楼 2013-01-21 13:50:53
Step 6: Priming
Painting the mesh works best when it is positioned without a solid surface
directly behind it. If you don't do this the holes in the mesh will tend to
become blocked with paint. I've used a simple platform made of spare wire to
support the mesh, but the best option is going to depend on your painting
environment. Since spray paints are used you will want to consider using a spray
booth, respirator, and working outside.
White car primer adheres well to the clean wire mesh, and provides a good
surface for the top coat. Apply three thin coats and cover both sides of the
mesh. Allow to dry thoroughly.
Step 7: Alignment
Fit the eyes into the head temporarily and work out where the centre of each
pupil will need to be. Mark this spot with a light pencil mark. Getting this
position correct is particularly important with more realistic eyes. Since you
can see through the white of the eyes, the character's pupils need not line up
with your own.
17楼 2013-01-21 13:51:26
第六步:上底漆
原文中是用白色的车漆上的底漆,这个操作起来有一定的难度,我就不仔细翻译了,有需要的请自行机器翻译原文中的step 6。至于底漆,我觉得可以刷白色的丙烯染料。如果要用油漆请务必使用专门的油漆喷枪,否则会在网子上面糊一层。
第七步:校准
把眼睛放在头部确定瞳孔的合适位置,用铅笔标记。鉴于眼白部分也可以透视,人眼的位置基本上没啥关系。
18楼 2013-01-21 14:25:30
Step 8: Painting 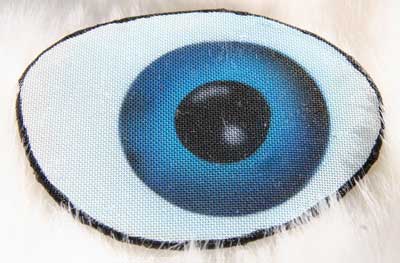 Airbrush on the eye design you need using Liquitex paints. How you do this
will depend on the design you have in mind and your comfort with different
airbrush techniques. Using stencils with circular holes for the pupil and iris
can be very helpful. You may want to paint the white of the eye with Liquitex
white as this will be noticeably whiter than the white primer. Add highlights
and shadows as required.
Step 9: Clearcoat
Finally apply two or three light coats of Liquitex gloss clear coat, diluted
to suit your airbrush. Once this has properly dried the eyes should be
reasonably resistant to damage. One notable exception is if you allow the eyes
to rub against one another prior to fixing in the head.
Step 10: Fit
How you fit the eyes to your head will depend on the construction of your
head, but hot glue will work well for most conditions.
Airbrush on the eye design you need using Liquitex paints. How you do this
will depend on the design you have in mind and your comfort with different
airbrush techniques. Using stencils with circular holes for the pupil and iris
can be very helpful. You may want to paint the white of the eye with Liquitex
white as this will be noticeably whiter than the white primer. Add highlights
and shadows as required.
Step 9: Clearcoat
Finally apply two or three light coats of Liquitex gloss clear coat, diluted
to suit your airbrush. Once this has properly dried the eyes should be
reasonably resistant to damage. One notable exception is if you allow the eyes
to rub against one another prior to fixing in the head.
Step 10: Fit
How you fit the eyes to your head will depend on the construction of your
head, but hot glue will work well for most conditions.19楼 2013-01-21 14:26:55
第八步:上色
用丙烯颜料和喷笔根据设计进行喷绘。蜡纸等可以在绘制瞳孔等的时候用到。如果底色用的白漆,在眼白部分再刷一层白色丙烯颜料可以使眼白更加白亮。如果需要可以适当加点瞳光或阴影。(阴影好像没必要,瞳光好像是必须的。)
第九步:刷清漆
原文中说的透明塑胶没搜到,估计用油画等的上光油之类的就好了。喷鼻如果喷不动要进行适当稀释。这样的好处是色彩更加牢固。当然,如果头部其他地方比眼睛更突出,一般磨不到的话,不刷这一层也可以。有些日式的更直接,外边加了一个透明塑料外壳,我觉得这样也不是很好,因为透明塑料容易起雾。
最后一步:安装
详细的安装方式与头部结构有关,但一般来说热熔胶适用于绝大多数情况。
21楼 2013-01-21 15:00:10

视野好,可是不好看,嘿嘿,我用过电烙铁,有一个可控温的,用它做过QI无线充电改装。。。
23楼 2013-05-10 13:42:27
共1页
2013-01-21 13:16:12